

Happy Sunday!
Today we are going to show you how to make super cute crafty kites for cards and brooches! These are really simple to make and really pretty.
Perfect for Sunday Mornings!

First off you will need some cute fabric, a couple of toothpicks, a needle and thread, some scissors and a lot of love!

Kite:
First up, we are going to make the main part of the kite.
Fold and stitch the fabric into a diamond kite shape. These should be made tiny and cute as you are going to be using toothpicks to run the length and breadth of it.
You can make templates to get the shapes right for each (like a dress cutter pattern), but then again we just made ours with guesstimation...and love!
It is best to hem two and join them together for extra sturdiness, but you can just do one if you are a little impatient.
This is the most time consuming part, the rest is real speedy, we promise!

Next up you need to sort out your toothpicks. Cut these to fit the length and breadth of the kite. We cut ours with the scissors....be careful not to ping the sharp bits in your eyes though!
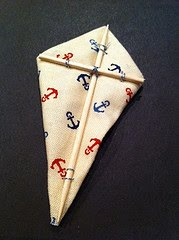
Ok, so you need to make a cross with the toothpicks and stick them on the fabric. Simply use a couple of stitches at each of the ends, and crossover stitches where the two toothpicks meet.
A little glue on the back of each toothpick is a great way to ensure they stay in the right place.
I won't tell if you won't!

Bows:
These bows are really easy to do and really effective too! Take a strip of the material and concertina to create an N shape. Then take a long strand of thread and stitch once in the middle. Do not pull the thread completely through unless you want one bow to be at the very end of the kite string.

Next up, simply wrap round the thread several times in the middle of the fabric (over the top of the stitch). When you pull tight, you will see the cute bow you have made! Once you are happy with it, thread the needle under the bunched up thread to secure it.

Then you simply do the same again for the additional bows you wish your kite to have. We found that 3 is the perfect amount of whimsy! Remember to leave a little thread between each as you want to show how high your kite is flying!
Once you have added the amount of bows you are happy with, simply stitch the thread into the back of the kite to complete it. Again, remember to leave a little extra thread to ensure your first bow isn't sitting too close to the bottom of the kite itself.
Ta Da!
Gosh, isn't it beautiful! We have made these and put them on cards and added brooches onto the back and worn them on windy days too. It is super cute when the wind plays with us and blows our bows!
We hope you enjoyed our first project. Let's go fly our kites!
No comments:
Post a Comment